bending polycarbonate on coated frame

Discussion in 'General Fabrication' started by kyleb, Oct 5, 2017.

  1. kyleb

    kyleb Member

    Joined:
    Oct 5, 2017
    Messages:
    5
    Likes Received:
    1
    Trophy Points:
    8
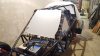
    I am new to messing with Polycarbonate. I am making a 1 piece windshield covering the front and both sides. In the picture is some mock up 1/16" material, but I will eventually use 3/16" for the final windshield.

    It is hard to tell from the picture, but the windshield will bend over the 1.5" tubing at roughly a 45 degree angle covering both sides.

    My bending brake is too small to handle this piece, so I was thinking use heat gun to bend it in place on the frame. The frame is already powder coated.

    first question. I know powder can handle some heat, but can it handle the heat created from using a heat gun while bending the material over it? I assume it would, but you never know until you know.

    Also, for securing the final windshield in place, What would recommend for hardware and what kind of spacing? I don't want to use rivets. it would need to handle the limits of the car which would be 180+mph.

    thanks, kyle

    20171005_180514.jpg
     
    Last edited by a moderator: Oct 6, 2017
  2. LECS-Chad

    LECS-Chad Guest

    Polycarb is a fun material but not very flexible when it comes to mounting. In my experience, you can mark where you need to "bend" with a sharpie and heat a tube and wrap around that. I searched on the web and found a few good sites to help with that.

    As for mounting, just drill and use rubber spacers. Sandwich the polycarb between and bolt through.
     
  3. Arkansas Metal Art

    Arkansas Metal Art Well-Known Member

    Joined:
    Feb 12, 2016
    Messages:
    515
    Likes Received:
    270
    Trophy Points:
    153
    IMG_0503.PNG

    I used 1.5" roll cage clamps on my last sand rail windshield. Similar to these. There are several styles to choose from. You might have issues heating enough surface area to accurately bend a piece of 3/16 that size. You might consider doing a 3 piece. Keep us posted on your progress.
     
  4. Motobilt

    Motobilt Well-Known Member

    Joined:
    Apr 6, 2016
    Messages:
    83
    Likes Received:
    95
    Trophy Points:
    48
    Simply wrapping this around a tube is not going to yield the result you want. At the top of the windshield you have a much larger radius that you will need at the bottom. Heating poly and forming 3/16" might be fun to get the heat consistent and not discolor the part.

    I would recommend building a windshield frame to bolt the poly between on the front. The speeds you are talking about potentially reaching can create some issues you. In the event you swap ends at speed that will be a huge sail. Something to consider.
     
  5. kyleb

    kyleb Member

    Joined:
    Oct 5, 2017
    Messages:
    5
    Likes Received:
    1
    Trophy Points:
    8
    I did attempt to heat and bend some thin 1/16 poly and definitely learned quick that this wasn't going to be easy.

    Like what was previously mentioned, the distance to heat is too big to get it done evenly and I can't image how long it would take at triple the thickness.

    I was considering bending it cold as well using a friends large brake, but also like motobilt mentioned, the radias I need changes as it gets closer to the top and bottom.

    The people at Pro Glass told me they would need a female mold to be able to make a 1 piece windshield like mine. I don't even know how to approach that.

    That said, I am considering a 3 peice.

    I do like those clamps. I wonder if it will start to look bulky having multiple in place. How much distance between each one do you think is neccesary? I think I could get away with (talking about the main front glass) say 4 on the top, 4 on the bottom and zero on the sides as long as I have some rubber at the same thickness as the clamps so the glass has something seat against.

    Good point about the car turning into windsail if I spun it. It would either blow out the glass, act as a parachute, or launch me into the air. Hmm.
     
  6. kyleb

    kyleb Member

    Joined:
    Oct 5, 2017
    Messages:
    5
    Likes Received:
    1
    Trophy Points:
    8
    I just had a thought. Tell me what you all think. Just talking fastening the windshield here. That Anzo Usa clamp is one of the better clamps I have seen that could work for this purpose. There are a few design elements about it that could cause some issues...but, I thought wjat about T-bolt clamps? I should probably draw up what I am thinking, but imagine the tbolt clamp around the tubing with the nut sidefacing outward towards the sky. So, I can place a washer, the 3/16" windshield, another washer, and then the nut on top of that. Depending on the size of the tbolt clamp, It should get close to resting the windshield close to the outer edge of the tubing which rubber striping will fill in any gap.
     
  7. kyleb

    kyleb Member

    Joined:
    Oct 5, 2017
    Messages:
    5
    Likes Received:
    1
    Trophy Points:
    8
    here is a little drawing...
     

    Attached Files:

  8. kyleb

    kyleb Member

    Joined:
    Oct 5, 2017
    Messages:
    5
    Likes Received:
    1
    Trophy Points:
    8
    update here. I ended up getting billet clamps made. Same price per piece compared to the Anzo product and exactly what I needed. Here is the waterjet cut lexan in place. I went with a 3 piece windshield instead of bending.
     

    Attached Files:

    Arkansas Metal Art likes this.

Share This Page

  1. This site uses cookies to help personalise content, tailor your experience and to keep you logged in if you register.
    By continuing to use this site, you are consenting to our use of cookies.
    Dismiss Notice